Skip to content
The Edge Bench

Stones, sharpeners & how-to · Sharpening

Why is my knife still dull after sharpening?

Six causes account for nearly every case, and five of them are technique rather than equipment. Here is how to tell which one you have, in the order worth checking.

By Stephen V.Updated How we review
#ad

We earn a commission when you buy through our Amazon links, at no extra cost to you. It never changes a verdict, and we say so when the cheaper knife is the better buy. How this works.

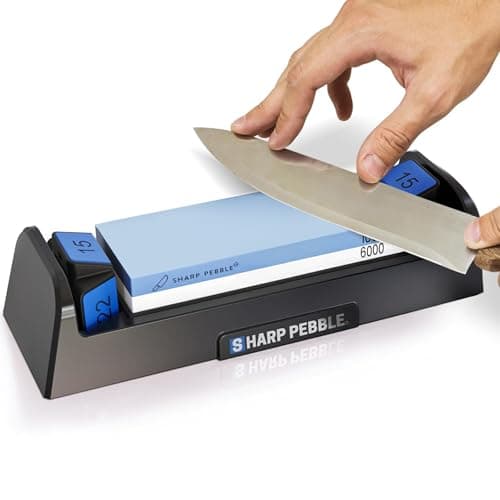
Nine times out of ten the answer is that your angle moved and you never raised a burr — and the fix is an angle guide, not a better stone. If you want the single purchase that solves this for most people, it is a combination stone with the angle guides built into the hardware: the Sharp Pebble 1000/6000 kit below is the pick, and it is the pick precisely because the guide is part of the stone rather than a separate skill. Before you buy anything, though, work through the diagnosis — five of the six causes are free to fix.

The underlying mechanism is worth understanding because it makes the whole list obvious. A sharp edge is the intersection of two flat planes. Sharpening means grinding each of those planes back until they meet in a line, and "meeting in a line" is a physical event you can detect: a microscopic wire of displaced metal, called a burr, forms along the opposite side of the edge. No burr means the planes have not met, and no amount of further polishing on an edge that has not been formed will make it sharp. Most failed sharpening is grinding the sides of a blunt edge beautifully smooth without ever making them meet.

The six causes, in the order worth checking

1. Your angle wandered. The commonest cause by a wide margin. If your wrist rolls even a few degrees through the stroke, you grind a convex curve instead of a flat plane, and a convex curve meeting another convex curve produces a rounded apex, which is the definition of dull. Freehand sharpening is hard for exactly this reason and almost nobody is good at it in their first ten sessions. Test: color the bevel with a marker pen and take three strokes. If the ink is gone in a band near the shoulder but intact at the very edge, your angle is too high. If it is gone at the edge only on some strokes, it is wandering.

2. You never raised a burr, or never removed it. Two failures with the same symptom. If no burr forms, keep working the coarse side — you have not reached the apex. If a burr formed and is still attached, the knife will feel aggressive on your thumb and will fail on paper, because you are cutting with a fragile wire that folds over instantly. Test: run a fingertip across (never along) the back of the edge. A burr catches like a tiny hook. Remove it with a few very light alternating passes, or on a strop.

3. Your stone is glazed or dished. Stones load up with steel swarf and stop cutting; soft stones also wear into a dish, so the middle of your stroke is touching nothing. A glazed stone feels slick and produces no slurry. Test: lay a ruler across the stone and look for daylight in the middle. Our flattening guide covers the fix.

4. You started too fine. A 3000 or 6000 grit stone polishes; it does not cut. On a genuinely blunt knife you can work a fine stone for an hour and achieve a beautifully shiny blunt edge. Start at 1000 grit — or coarser, 400 grit, if the edge is chipped or visibly rolled — and only move up once a burr exists along the full length. Whetstone grits explained has the progression.

5. You stopped too soon.Related, and the most under-reported. Restoring a truly dull 8-inch chef's knife on a 1000-grit stone is ten to twenty minutes of work, not ninety seconds, and far more passes than most videos imply. If you are doing ten strokes per side and expecting a transformation, the equipment is not the problem.

6. You are using the wrong tool for the edge. A honing rod removes no metal and cannot sharpen anything — if your entire routine is a rod, the knife has never been sharpened. A 20-degree pull-through on a 15-degree Japanese knife grinds at the wrong angle and never reaches the apex. A standard sharpener on a serrated blade just flattens the teeth. See sharpening versus honing and the common mistakes guide.

The two-minute diagnosis

Do these in order and you will know which of the six you have. First, the paper test: hold a sheet of printer paper by one corner and slice down through it. A sharp knife cuts a clean ribbon; a dull one tears or slides. Second, the marker test above, which tells you whether you are reaching the apex. Third, the burr check across the back of the edge. Fourth, a ruler across the stone. If paper fails and no burr ever formed, the answer is cause 1, 4 or 5 and the fix is free. If a burr formed and paper still fails, the burr is still attached and the fix is a strop or a few light passes.

How the picks below are scored. These three products are not competing with each other — each addresses a different cause on the list above — so they are scored on one rubric built around that: diagnostic fit (how completely it solves the cause it is aimed at), ease of use, edge result, build and value. Ranked by the resulting average. See how we review for the standing methodology.

The short answer

Quick picks

#KnifeBest forScorePrice
01
Sharp Pebble Sharp Pebble Complete Whetstone Kit, 1000/6000
Sharp Pebble Complete Whetstone Kit, 1000/6000

The single purchase that fixes the commonest cause. A dual-grit 1000/6000 stone on a non-slip bamboo base with switchable angle guides built in at 15, 17, 20 and 22 degrees - and the guides are the point, because they put the one skill most people lack into the hardware instead of into your wrist. Starts at the right grit, too, which solves cause four.

Best fix for a wandering angle
8.8
$45.99Amazon
02
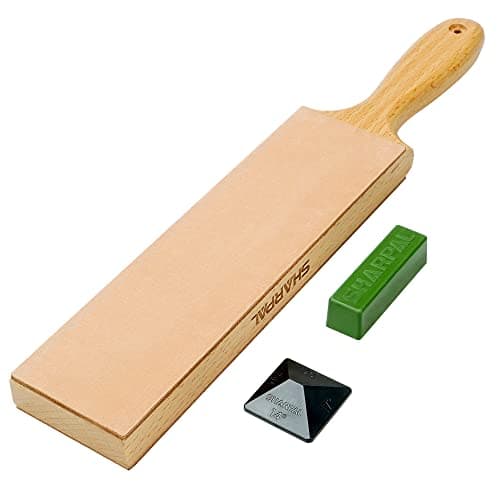
SHARPAL SHARPAL 205H Double-Sided Leather Strop Kit
SHARPAL 205H Double-Sided Leather Strop Kit

The fix for cause two, and the step most people skip entirely. Genuine cowhide over a block, smooth on one face and suede on the other, with green polishing compound and an angle guide included. Stropping removes the burr a stone leaves behind, which is frequently the whole difference between 'sharp' and 'unnervingly sharp'.

Best fix for an unremoved burr
8.4
$22.99Amazon
03
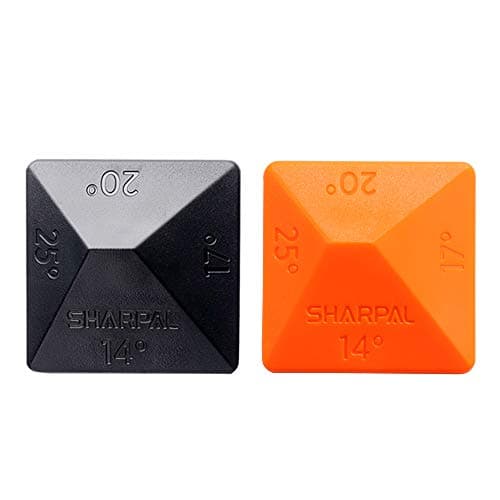
SHARPAL SHARPAL 196N Angle Pyramid Guide (2-pack)
SHARPAL 196N Angle Pyramid Guide (2-pack)

The cheapest possible fix for cause one, if you already own a stone you like. A small molded pyramid with reference faces at 14, 17, 20 and 25 degrees that sits on the stone beside the blade, turning an abstract number into something you can see. Even experienced sharpeners use one at the start of a session to check themselves.

Best cheap angle reference
8.1
$6.99Amazon

#ad · Live prices from the Amazon Product API, as of October 9, 2026. Where we have no verified live price, we show none — a gap beats a number that has rotted.

In detail

The picks, in full

01
Sharp Pebble Sharp Pebble Complete Whetstone Kit, 1000/6000

Best fix for a wandering angle

Sharp Pebble Complete Whetstone Kit, 1000/6000

1000/6000 combination stoneBuilt-in guides: 15/17/20/22 degreesNon-slip bamboo baseNo soaking accessories needed
8.8/10

The single purchase that fixes the commonest cause. A dual-grit 1000/6000 stone on a non-slip bamboo base with switchable angle guides built in at 15, 17, 20 and 22 degrees - and the guides are the point, because they put the one skill most people lack into the hardware instead of into your wrist. Starts at the right grit, too, which solves cause four.

Diagnostic fit
9.5
Ease of use
9
Edge result
8.5
Build
8
Value
9

Pros

  • The built-in angle guides directly address the cause behind most failed sharpening
  • 1000 grit is the correct starting grit, so it will not polish a blunt edge indefinitely
  • The 6000 side finishes the edge once the burr exists, with nothing else to buy
  • Non-slip base means the stone is not moving while you are trying to hold an angle

Cons

  • It does ask you to learn a small skill, guides or not
  • A 1000-grit start is slow on a knife that is genuinely blunt rather than dulling
  • Four fixed guide settings will not match every knife exactly
  • A soft-binder stone will dish faster than a hard ceramic against very hard steel

Don't buy this if…

…you already own a good stone and your problem is the burr rather than the angle - buy the strop below instead and save the money.

$45.99View on Amazon

Price as of October 9, 2026. Prices change — Amazon's at checkout is the one that counts.

#ad · we may earn a commission from this link to Sharp Pebble Complete Whetstone Kit, 1000/6000

02
SHARPAL SHARPAL 205H Double-Sided Leather Strop Kit

Best fix for an unremoved burr

SHARPAL 205H Double-Sided Leather Strop Kit

13.2 in x 2.44 in blockSmooth + suede cowhide facesGreen polishing compound includedAngle guide included
8.4/10

The fix for cause two, and the step most people skip entirely. Genuine cowhide over a block, smooth on one face and suede on the other, with green polishing compound and an angle guide included. Stropping removes the burr a stone leaves behind, which is frequently the whole difference between 'sharp' and 'unnervingly sharp'.

Diagnostic fit
9
Ease of use
8
Edge result
9
Build
7.5
Value
8.5

Pros

  • Removes the burr a stone leaves behind, which is often exactly why a freshly sharpened knife fails the paper test
  • Takes thirty seconds at the end of a session, so it is not another chore
  • Compound and guide included, so there is nothing else to buy
  • Cheap enough to add to a stone you already own

Cons

  • Only useful once you are already raising a burr - it is the last step of a process
  • Cannot sharpen anything on its own, and will not help if the apex was never formed
  • Leather needs occasional re-charging with compound
  • Easy to round the apex if you lift the spine while stropping

Don't buy this if…

…you have never raised a burr on a stone - stropping is the final step of a process you have not started, and the stone above is the purchase.

$22.99View on Amazon

Price as of October 9, 2026. Prices change — Amazon's at checkout is the one that counts.

#ad · we may earn a commission from this link to SHARPAL 205H Double-Sided Leather Strop Kit

03
SHARPAL SHARPAL 196N Angle Pyramid Guide (2-pack)

Best cheap angle reference

SHARPAL 196N Angle Pyramid Guide (2-pack)

14 / 17 / 20 / 25 degree facesSits on the stone2-packWorks with any flat stone
8.1/10

The cheapest possible fix for cause one, if you already own a stone you like. A small molded pyramid with reference faces at 14, 17, 20 and 25 degrees that sits on the stone beside the blade, turning an abstract number into something you can see. Even experienced sharpeners use one at the start of a session to check themselves.

Diagnostic fit
8.5
Ease of use
8.5
Edge result
7
Build
7
Value
9.5

Pros

  • Turns an abstract angle into something visible next to the blade, which is the whole problem
  • Four faces cover Japanese, Western and outdoor grinds
  • Costs almost nothing, and works with the stone you already own
  • Useful even to experienced sharpeners as a session-start reference

Cons

  • It is a visual reference, not a clamp - it holds nothing for you
  • Still requires you to keep your wrist steady through the stroke
  • Easy to outgrow once the angle becomes muscle memory
  • Does nothing for a glazed stone, the wrong grit, or an unremoved burr

Don't buy this if…

…you are buying a guided kit or a clamped system as well - their built-in angle setting already does this job.

$6.99View on Amazon

$9.9930% off

Price as of October 9, 2026. Prices change — Amazon's at checkout is the one that counts.

#ad · we may earn a commission from this link to SHARPAL 196N Angle Pyramid Guide (2-pack)

The burr, in detail, because it is the thing nobody explains

Everything turns on this, so it is worth a section. As you grind one side of a blade, steel is displaced rather than entirely removed, and when you finally reach the apex that displaced metal folds over onto the opposite face as a microscopically thin wire. That wire is the burr, and its appearance is the only reliable signal that the two bevels have actually met.

Two consequences follow. First, if you cannot detect a burr, keep going — you have not finished the coarse stage, and moving to a finer stone now will produce a polished blunt knife. Detect it by dragging a fingertip gently across the edge from spine to apex (never along it), on the side opposite the one you are grinding. Second, the burr must then come off, because a wire that thin folds the instant it meets food. Remove it with a few feather-light alternating passes on your finest stone, or on a strop. A knife that feels savagely sharp on your thumb and then fails to cut paper is almost always a knife with an attached burr.

What to check, and what it tells you

SymptomLikely causeFix
No burr ever forms, however long you workAngle too high, or grit too fineLower the angle; start at 1000 grit or coarser
Burr forms on part of the edge onlyAngle wandering, or stone dishedAngle guide; flatten the stone
Feels sharp on the thumb, fails on paperBurr still attachedLight alternating passes, or a strop
Marker ink gone at the shoulder, intact at the edgeAngle too highDrop the spine; use a guide
Stone feels slick, no slurry, nothing happeningGlazed or loaded stoneLap or flatten it
Sharp for one meal, dull again immediatelyBurr was the edge, or wire edge from an electric unitRe-sharpen and deburr properly
Will not get sharp however carefully you workWrong tool for the blade (serrated, single bevel, hard steel at 20°)Match the tool to the knife

The one case where the knife, not you, is the problem

It is rare and it does exist. A very soft, cheap stainless blade can struggle to hold any edge at all — it will take one and lose it within a meal, which reads as "still dull". A knife with a full bolster that has been sharpened for years may have a step at the heel, so the first inch never touches the stone. A blade that has been through a coarse electric sharpener repeatedly can carry a wire edge that keeps crumbling. And a damaged or recurved profile needs grinding back to a straight edge before normal sharpening will work at all.

None of those are DIY-friendly, and all four are reasons to consider a professional service rather than another purchase — see our guide to choosing a local sharpener. If the knife is a soft budget blade, the honest answer may be that it is doing its best; easiest knives to sharpen explains which steels reward the effort.

Once it is sharp, keeping it there

The work above is the hard part and it only has to happen every few months. Between times, a honing rod realigns the edge before it needs grinding again — fifteen seconds before each session, which is the single highest-return habit in a kitchen. Start with how to use a honing steel, and remember that honing is not sharpening: if a rod is your whole routine, you are back at cause six.

The other half is what the edge touches. Glass, stone and ceramic boards dull a knife faster than anything else in normal use, and our board roundup ranks on exactly that. Why knives go dull covers the mechanism if you want the background.
How we picked

We did not lab-test these knives

Everyone in this category says they tested twenty knives in a professional kitchen. We have not hands-on tested any of these, and we say so. What we did instead: compiled the published specifications — steel type and hardness (HRC), edge angle, blade geometry, weight and build — applied established sharpening standards, ran the value math (spec quality ÷ live price), and scored each product against a published rubric. The scores are judgments from documented research — not measurements we took, because we do not have a test lab and we will not pretend we do. Where a number came from someone else's work, we name them in Sources.

Questions

Frequently asked

How do I know if I raised a burr?
Drag a fingertip gently across the edge — from spine toward apex, never along it — on the side opposite the one you have been grinding. A burr catches like a tiny hook or feels slightly rough. You can also hold the edge up to a light: a burr catches light as a fine bright line. If there is nothing, the bevels have not met and you are not finished.
How many strokes should sharpening a dull knife take?
Far more than most people expect. Restoring a genuinely dull 8-inch chef's knife on a 1000-grit stone is realistically ten to twenty minutes of work, and dozens of passes per side rather than ten. The number is not the useful target anyway — the burr is. Work until a burr exists along the entire length of the edge, then switch sides.
Is my whetstone too fine?
If it is 3000 grit or above and you are starting from blunt, yes. Fine stones polish an existing edge; they do not create one. Start at 1000 grit for a dulling knife and 400 for a chipped or badly rolled one, then progress upward. See whetstone grits explained.
Why does my knife go dull again after one meal?
Usually because what you sharpened was the burr rather than the edge: a wire of displaced metal is briefly very sharp and folds over the first time it meets a carrot. Re-sharpen, confirm the burr, then deburr properly with light alternating passes or a strop. The other common cause is a very soft blade, or a glass or stone cutting board.
Can a honing rod make my knife sharp?
No. A honing rod removes essentially no metal — it realigns an edge that has rolled over. If your knife has genuinely lost its edge, no amount of honing will restore it, and this is the single most common misunderstanding in the whole category. See sharpening versus honing.
Should I buy a better stone or a guided system?
If your angle is the problem — and the marker test will tell you — a guide fixes it far more cheaply than a better stone does. The guided kit on this page puts the angle in the hardware; the pyramid guide does the same for a stone you already own. Consider a clamped system only if freehand work keeps failing after you have tried a guide; our systems roundup covers those.

Keep reading

Receipts

Sources

We do not run a testing lab, and we do not pretend to. Where a spec or a measured number came from someone else's work — a manufacturer's page, a published standard — we name them and link them. Where we could not verify something, we say so on the page rather than quietly leaving it out. Read our full method.